iPaaS Insights
Integration tutorials, tips and best practices

Running REST APIs on Apache Camel
Building connections between computer systems and applications is nothing new. Information technology specialists and software developers have been creating them for ages, eventually coining the term application programming interface (API) to refer to the ways that applications and systems communicate with each other.
APIs have evolved over the decades, with independent developers and software groups creating new specifications and foundations for building APIs. Whether they're used to accomplish a specific function or act as a general purpose template for all developers to use, these architectures allow developers to coordinate complex tasks between multiple endpoints and systems. One such architecture is the representational state transfer (or REST) API.
Developed in the early days of widespread Internet connectivity, it continues to be a popular deployment option for web-based and cloud-based services. Building them for collecting or rewriting web-hosted data is easy enough, but integrating a REST API with other systems may prove difficult thanks to the nature of how they store data.
Thankfully, it's easy to integrate your REST API with the whole of your tech environment by connecting it to Apache Camel. Camel is an open-source, fully-functional integration framework that gives developers a universal framework for connecting applications. Below, we'll discuss why REST APIs are beneficial for your business and developers, and then explore how to set it up to work with an Apache Camel deployment.
What Are REST APIs, and How Are They Built?
With the invention of the World Wide Web and Internet access for both business and personal use rising, developers needed a way for applications to easily communicate with web-based services. In 2000, a group of developers led by Roy Fielding, a chief architect of Hypertext Transfer Protocol (HTTP), envisioned the REST API framework as a solution to this problem. Based primarily on HTTP communication specifications, REST APIs (sometimes called RESTful APIs) grants engineers the power to easily connect systems and applications to each other, even over distributed networks.
 REST APIs are built with HTTP as the primary mode of communication between clientside and serverside systems. Requests require just a destination URL and intended action to commit. Actions mainly fall under four categories: GET, for retrieving data from a specified location; POST, for creating new data in that location; PUT, to edit existing data; or DELETE for deleting it.
The REST API schematic was designed to foster a uniform interface with no need for developers to download any additional resources or format installations. Everything can be accomplished right from the API level, and since client and server applications have to be separated under the specifications of the architecture, it supports distributed environments and cloud-based requests by design.
These APIs are stateless by nature, with all the information that's necessary to complete the request contained within the request itself. There's no need to gather than information from anywhere else first; all the instructions are baked into the interface itself. This is true for both inbound and outbound messages, creating a truly self-contained architecture with resources able to be cached on either side.
Connecting to a REST API on Apache Camel
Now that we know about REST APIs and how they're created, let's dive into how to get one running with Apache Camel. Camel natively supports the REST architecture through its components, allowing your developers to craft integrations with web-based software and services with ease.
The first step in connecting a REST API to Camel is setting up Camel's REST DSL. This DSL lets Camel designate REST-compatible endpoints as consumers for your routes. It automatically configures your routes and integrations to support REST services, so there's no need for any complicated modification to get it up and running.
As of Apache Camel 3.17, Camel supports Netty HTTP, Jetty, Servlet, and Undertow as bootstraps for REST APIs.
NOTE: This guide assumes you have a basic understanding of Camel and Java.
Creating a usable API with Camel is simple and can be done in multiple coding languages. For this example, we’ll be working in Java.
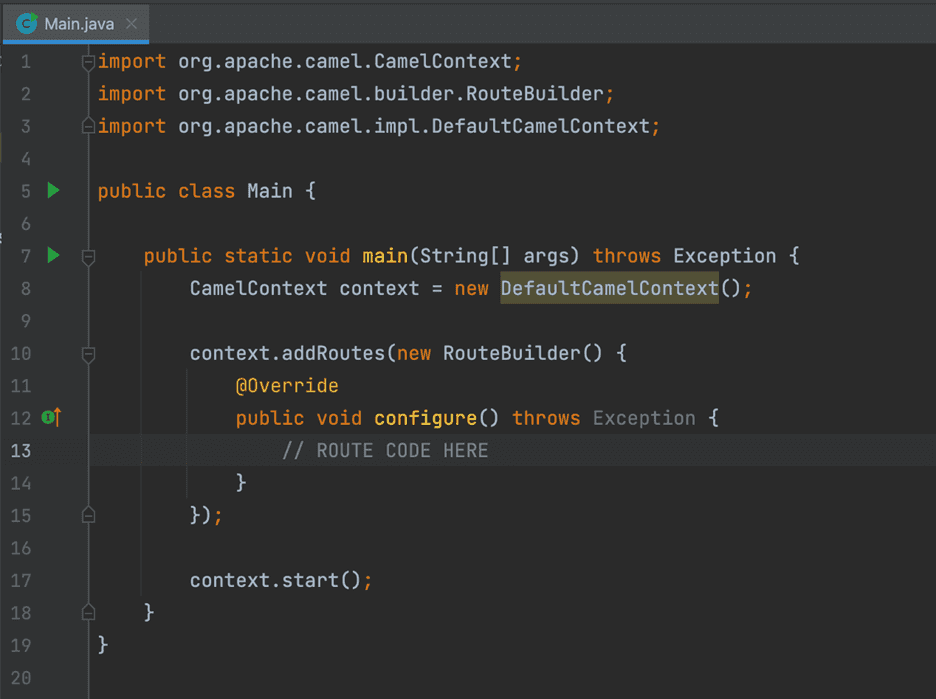
First things first, we need to perform the same Java setup that’s required for all Camel routes (see Figure 1). For Java, this is simply a class with a main method and a CamelContext. Within the context, we will define our API and routes.
Figure 1
We can define and configure our API within the configure method of our new RouteBuilder using the Rest DSL (see Figure 2). Configure the API using the restConfiguration method where both the host and port can be defined. restConfiguration has more options but for this example we’ll just expose localhost and port 8080.
Figure 2
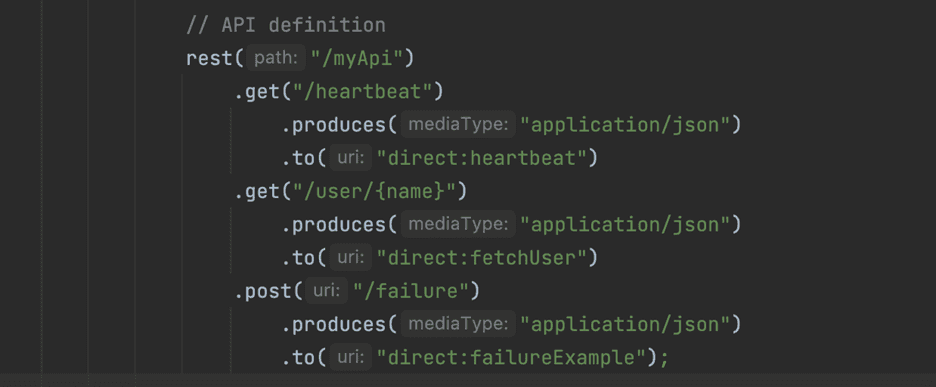
Now we define the API itself using Rest DSL. This example defines an API with a parent path /myApi, and three endpoints which each lead to a unique Camel route (see Figure 3):
GET /heartbeat- routes todirect:heartbeatGET /user/{name}- routes todirect:fetchUserPOST /failure- routes todirect:failureExample
NOTE: The GET /user/{name} endpoint actually takes a path variable, name, which Camel automatically adds to the request as a header. For example, if the request GET /myApi/user/Roberto is made to this API endpoint, Camel will automatically add a header called name with the value Roberto. This header can then be used within the route the same as any other header.
Figure 3
The API is now defined, so the last part is to add the direct routes that our API will direct our traffic to (see Figure 4). These three routes will be called by our API as defined in our Rest DSL, performing the following tasks:
direct:heartbeat- returns the current exchangeIddirect:fetchUser- sets an HTTP response header to return a 404 and returns the name header provided in the requestdirect:failureExample- sets an HTTP response header to return a 500 error response and returns the current exchangeId
Figure 4
And that’s it! We can now start the route and observe the logs (see Figure 5), showing that the API is ready to use at local host on port 8080.
Figure 5
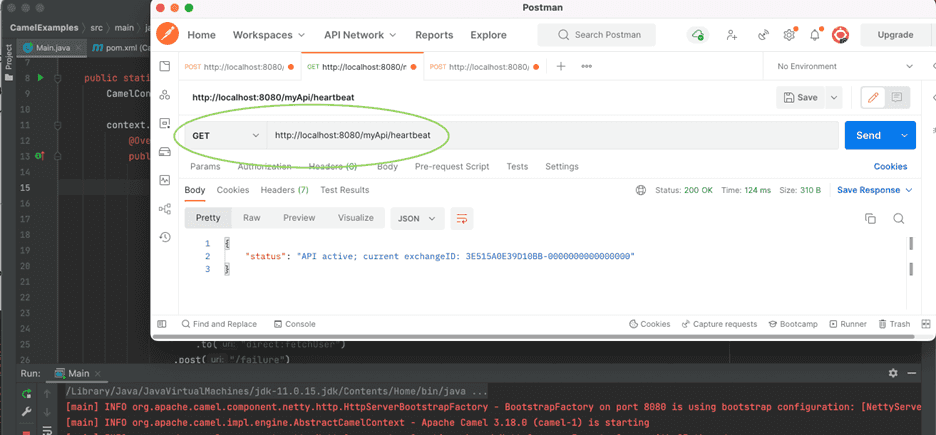
Using an API client like Postman, we can send a request to our heartbeat endpoint and view the response from our API with the command GET http://localhost:8080/myApi/heartbeat (see Figure 6).
Figure 6
You now have a fully functioning API with three defined endpoints using only a few lines of code. Camel can handle simple and complex APIs alike, all via an easy-to-use coding language that saves time and energy for developers.
What Are the Advantages of REST APIs?
When building APIs using the REST architecture, there's a multitude of advantages and considerations that you'll want to know. Unlike other API specifications, REST APIs can return a number of different formats, including (but not limited to) JSON, XML, and YAML. Thus, you can easily format your REST-driven data into common types without having to add an extra step for conversion.
This is one way in which REST APIs promote freedom for developers, especially those looking to create complex integrations with web-based systems and apps. The REST architecture supports on-demand coding, making it a cinch for developers to create on-the-fly modifications to your APIs.
Since REST APIs natively connect applications and systems over the web, this makes it a perfect fit for cloud and microservices deployments. It's popular for connecting cloud-based services and systems together thanks to its native scalability.
You can learn more about connecting REST APIs with Camel by checking out Apache's official documentation for REST APIs and the REST DSL.


